Vegan Flapjacks: Perfect for Everyday Baking
Discover how to make chewy vegan flapjacks with coconut, dried fruit, and a stunning chocolate drizzle. These dairy-free treats are perfect for lunchboxes and keep for two weeks in an airtight container.
There's something wonderfully comforting about flapjacks. That perfect balance of chewy and crispy, the natural sweetness from golden syrup, the satisfying heft that makes one piece genuinely filling. These vegan flapjacks deliver all of that classic goodness with a tropical twist from coconut and a gorgeous chocolate drizzle that makes them feel extra special.
Perfect for lunchboxes, afternoon tea, or keeping in a tin for whenever you need a proper energy boost, these flapjacks prove that plant-based baking can be both simple and utterly delicious.
The Golden Trio
Dark brown sugar, vegan butter, and golden syrup melted together create the sticky, sweet base that holds everything together. This combination brings deep caramel flavour and creates that characteristic flapjack chewiness. The dark brown sugar's molasses content adds richness that light sugar simply can't match.
The key instruction here is crucial: don't let the mixture boil. Gentle melting combines everything smoothly without burning the sugar or creating grainy texture. Keep the heat medium-low and stir occasionally until everything melts together into glossy perfection.
Coconut Changes the Game
Traditional flapjacks use oats, but this recipe takes a different approach with desiccated coconut as the main ingredient. The result is lighter, more crumbly, and brings subtle tropical sweetness that works beautifully with the golden syrup. Coconut also adds healthy fats that make these genuinely satisfying.
Combined with self-raising flour and bicarbonate of soda, you get structure and a slight rise that creates interesting texture. These aren't dense like traditional flapjacks, they're somewhere between flapjack and cookie, in the best possible way.
Dried Fruit Flexibility
Three ounces of dried fruit adds natural sweetness and chewy bits throughout. Choose whatever you fancy: raisins, cranberries, chopped apricots, dates, or mixed fruit. Each brings its own flavour and creates variety in every bite.
Chop larger dried fruits into smaller pieces so they distribute evenly. Nobody wants one enormous piece of apricot in their flapjack whilst the rest are fruit-free. Even distribution means every piece gets its fair share of everything delicious.
The Wobbly Stage
Here's where nerve is required: taking them out of the oven when they still look wobbly and underdone. This feels wrong, but trust the recipe. Flapjacks firm up dramatically as they cool. Overbake them and you'll end up with hard, crispy pieces rather than that gorgeous chewy texture you're after.
Eleven to twelve minutes at 170°C fan is exactly right. The edges should look set and slightly golden, whilst the centre still jiggles when you shake the tin. That 30-minute firming-up time at room temperature is when the magic happens, transforming what looks like a mess into perfect flapjacks.
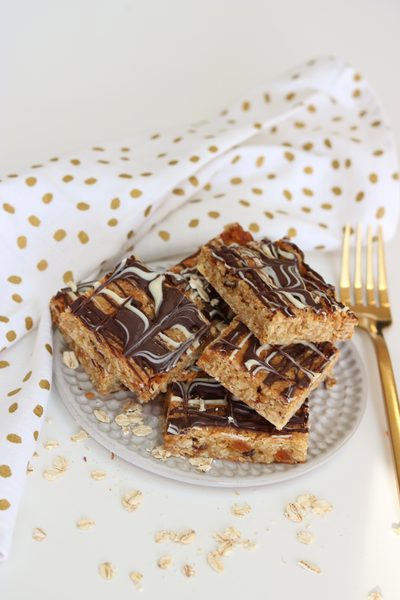
Chocolate Drizzle Drama
The dark and white chocolate swirl isn't just pretty, though it absolutely is. It adds another flavour dimension and textural contrast. The chocolate sets firm in the fridge, creating a snappy coating that gives way to chewy flapjack underneath.
Melting the chocolates separately and swirling them creates that professional marbled effect. Use a spoon to drizzle one chocolate, then the other, then drag a skewer or knife through both to create swirls. There's no wrong way to do this, wonky swirls look just as good as perfect ones.
Patience Pays Off
That hour in the fridge before cutting is essential. Cold flapjacks cut cleanly into neat pieces. Warm ones crumble and create messy edges. If you're impatient, 30 minutes in the freezer works too.
Use a sharp knife and wipe it clean between cuts for the neatest pieces. Cut into whatever size suits you: small squares for portion control, large rectangles for serious appetites, or slim fingers for elegant afternoon tea.
Storage Success
These flapjacks keep brilliantly in an airtight container for up to two weeks. Layer them between baking paper to prevent the chocolate decoration sticking together. They're also freezer-friendly for up to three months, making them perfect for batch baking.
Pack them in lunchboxes, keep them in your desk drawer, or serve them at gatherings. They're portable, non-messy, and provide genuine sustained energy rather than a sugar spike and crash.
Customisation Ideas
Once you've mastered the basic recipe, try variations. Add cacao nibs for extra chocolate hit. Mix in some chopped nuts for crunch. Try different chocolate combinations like milk and dark, or go full decadent with just dark chocolate drizzle. Add orange zest for chocolate-orange flapjacks.
The base recipe is forgiving enough to handle experimentation. Just keep the wet-to-dry ratio roughly the same and you'll be fine.
More Than Just a Snack
While these excel as grab-and-go snacks, they're also brilliant for entertaining. Arrange them on a nice plate, and suddenly you've got something that looks professionally made. They work at casual gatherings and slightly fancier afternoon teas equally well.
They're also perfect for sharing with non-vegan friends and family. Most people can't tell they're dairy-free until you mention it, making them excellent ambassadors for how good plant-based baking can be.
So grab that golden syrup, melt that butter, and get ready to make flapjacks that'll disappear faster than you can say "just one more piece." Your biscuit tin is about to become everyone's favourite spot.
Ready to make your own? Download the full recipe with ingredients and step-by-step instructions below.

Brain fog, poor focus, and low mood, the nutritional angle most people overlook
Brain fog, poor focus, and low mood often have a nutritional explanation and DHA, Lion's Mane, B12,…
Fish oil vs algae oil, what's actually different (and what isn't)
Algae oil and fish oil contain the same DHA and EPA molecules, because fish don't make it themselve…
Your brain is 60% fat. Here's what that actually means.
Your brain is built from fat, specifically DHA and here's what that actually means for why Omega-3 …
Calcium is Only Half the Story
Why bone health needs three nutrients working together, not one working alone